Thursday, December 5, 2013

Scar Wax Elf Ears


This is an older post I had put on my facebook makeup page (I pasted it straight from facebook, so the font is a little messed up). How to make scar wax elf ears easily! I used these for photo shoots and costumes, super easy and effective without breaking the bank!


1. Start with a small penny-size blob of the nose and scar wax. Usually I don't need more than that for one small elf ear.


2. Apply spirit gum to the top of the ear, making sure to get it into the creases of the ear so the wax has something to hold on to. Lightly tap the spirit gum with a finger to make it tacky, as it will not stick properly if it is just wet.


3. Apply the wax over the ear where you want to build up the tip. You don't have to do any smoothing just yet, just mold the basic shape.


4. Make sure to put some wax in the creases as well, the more the wax has to hold onto the better.


5. Now you can start sculpting the shape of the tip, as well as smoothing out the edges. I like to use sculpting tools for this, as the heat from your fingers will cause the wax to get very sticky and near impossible to work with.


6. Usually I will make a little cardboard piece to put behind the ear to keep hair out of the wax (getiing the wax out of your hair is not fun), but a hair clip will do in a pinch.


7. After you are done your sculpting, you can add some color if you wish. I suggest using a soft brush to apply the color, as hard brushes will dent the wax and ruin all of your hard work. And then you are finished^^. If you can manage not to play with the ears while you are wearing them, they will easily last all night long.

Thursday, October 17, 2013

Demon Monster Mask

This mask is my creation for my strolling character at a Halloween haunt. It is based on my own design, and I wear a black robe with chains and have Hans (my zombie head on a stick) with me. It's a fun costume, and can be pretty freaky in the dark.


The mask was sculpted with papier mache. I would have preferred to make a latex mask for much more detail, but I didn't have the cash at the time. He has a separate jaw that is attached with elastic that allows me to move his mouth when I move mine. Here is an earlier picture while I was putting the first few coats of paint on him:


His horns are thin sheets of craft foam rolled into shape and painted, and the teeth and small spikes on his head are sculpted with Sculpey. I love translucent Sculpey for sculpting teeth and claws, you can get a much more natural look than with white. I also like adding a few layers of gloss to the teeth and mouth whenever I make a creature like this because Sculpey can be pretty brittle, and it gives the mouth a good slobbery look!


This mask actually has a full head of hair (you can see some I glued on in front of his ears (and some poking out of his mouth in this shot..whoops..). I attached a full wig to the back of his head, but it didn't give me the coverage I wanted in my costume (my ears and neck were too visible for my liking) so I attached a piece of black cloth as a hood last minute.


Here you can see what his mouth looks like open (I swear his hair isn't supposed to be in his mouth!), when my face is painted black underneath it looks pretty great! I've worn this mask a few weekends now and he's been getting some wear and tear (can see some spots of paint rubbing off on the ears, and I've had to fix his jaw once so far) but it's surprisingly comfortable.

Head On A Stick

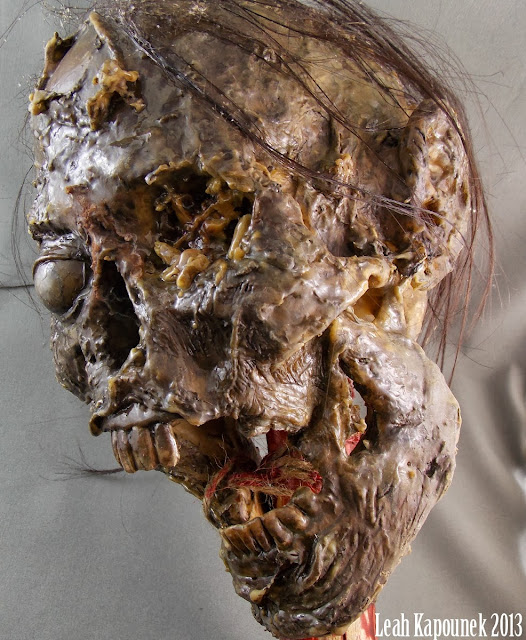
This is my head on a stick, affectionately known as 'Hans'. He is a prop stave I use as a strolling character (more on that character in an upcoming post) at a Halloween Haunt.


Hans was created using a pre-made plastic skull that I attached to a wooden stave. He was simply a bare skull; I created this delightfully juicy prop by layering tissue and liquid latex over him, and using a hard brush to 'sculpt' finer details, like wrinkles, etc. into his skin before it dried. I sculpted a slightly oblong ball with Sculpey for his eye, and used more tissue/latex to create the look of eyelids. I glued his jaw at an unnatural angle so the whole piece would be that much more disturbing.


I'm sure you can see Hans has a lovely head of..er..hair. This is by far the easiest, yet most unsettling thing I can suggest to add to a prop like this, for some reason putting hair on it just adds a creepiness factor you can't get otherwise. I used strands of wig hair and attached them with gloss varnish for a globby/rotten look.


The ear was from this old toy CSI kit I got a bajillion years ago, to build up clay faces for forensics. I stuck it on there because...well why not. I also thought Hans' gaping eye-hole was boring, so I rolled up some dried latex into little maggot-shaped blobs and stuck them in there with some more varnish. After a simple paint job (dollar store acrylics, mostly brown and black), I glossed Hans up wherever I thought he needed more rotten juicyness, and voila! Threw some twine and fake blood (also why not) on this bad boy and he was ready for haunting! Despite being mostly plastic, he's pretty durable, I've dropped him multiple times and he hasn't broken, though I'm not sure anyone would notice if he did!

Monday, September 16, 2013

Zerged


This look was a homage to StarCraft (modelled by my sister). It took a bit of preparation; I made the spines out of sculpey and attached them to her forehead using scar wax. It was only for one photo shoot so there was no real prosthetic made for her face, but unfortunately even in that short amount of time the wax began to melt and the spines started to slide down. Still made for a neat looking photo however, definitely one of my favourites!

She's dead, Jim...


Older shoot, very cold that day. This make-up was fun, you can get some very creepy effects with some purple-grey mottling. This was done with simple eye-shadows, you don't need expensive theatrical make-up to create truly ghastly effects. Thanks for putting up with me Jaime!

Ouch


This is a chemical burn/wound created with only a thin layer of liquid latex pulled up to create these effects. Brush some fake blood on/underneath the edges of the latex to give it the fresh painful look. Very easy and effective make-up!

Rage!


Another old shoot. I never get sick of throwing fake blood on my models! This was done in the fall, and the poor girl had to deal with being covered in fake blood and water in the cold. She's a trooper!

Bad Luck


Very old picture, maybe around 2008. Just showcasing what you can do in no time with some scar wax and fake blood.

There's something in your eye...


This was a fun shoot (bit of a throwback, this was around 2011 I think), my model Jaime puts up with so much from me. I created the stick/blood prop beforehand (the stick itself is attached to a small foam piece to protect her eye) and she is holding it in place as I take the picture. I love using natural elements in my photo shoots, and organic wood/stone just adds the perfect touch! Very gruesome, just is the way I like it!

Simple Zombie


Zombie face first post!!! Created with simple materials: liquid latex, fake blood and regular face make-up. Just in time for the Halloween season! (Model is my lovely sister Ashley, though not so lovely in this picture :S)